eSignature Integration with Python: KAiZEN Tutorial
Manual document signing slows down your operations, introduces errors, and compromises security. If you’re using Python to power your applications, integrating an eSignature API like KAiZEN can eliminate these challenges. With just a few API calls, you can send documents, request signatures, and verify status—all programmatically.
This blog will guide you through the process of integrating KAiZEN’s eSignature API with Python, enabling a more efficient and automated document workflow.
How to integrate eSignature into Python Applications:
Step 1:
Begin by listing the individuals who need to sign the document and determining the sequence of their signatures. KAiZEN allows for sequential signing, ensuring signers follow the order you define.
For Example:
Signer Information
| Signer Name | Order | Signer Email |
|---|---|---|
| Signer 1 | 1 | signer1@gmail.com |
| Signer 2 | 2 | signer2@gmail.com |
-
Step 2:
You’ll need to initiate a secure HTTP POST request to the KAiZEN “Initiate Sign API” with the following parameters:
HTTP Call Details
Parameters Name Value Content-Type application/json Method POST Endpoint https://fa-kaizen-prod.azurewebsites.net/api/Sign/RequestStr?code=RTa1A0GW5Yl92OF54-73lRqglLFCt_0pVcg86hWf1EjtAzFuNROcdA== Body JSON Body with parameters Key Parameters for the Request Body
Parameters Name Description Required? docContent Base64 Content for the PDF File Yes docName Name of the File Yes appToken Unique Code to initiate the request Yes requesterEmail Email address of the person initiating the request Yes requesterName Name of the person initiating the request Yes description Describes the document NO signers An array of the signers who needs to sign the document in the pre-defined order. Yes CallBackURL CallbackURL defines the url on which the KAiZEN should send a response once all the signers signs the document. It can be webservice url of Salesforce or any external page.
Eg: https://duumy.my.salesforce- sites.com/services/apexrest/KaizenCallbackURL/No newRequestEmailSubject Describes the email subject No requesterMessage Describes the prompt eSignature field No docDescription Describes the document No -
Step 3:
Python Code Sample for Integration
import http.client
import json

conn = http.client.HTTPSConnection("fa-kaizen-staging.azurewebsites.net")
payload = json.dumps({
  "docContent": "<>",
  "requesterEmail": "xyz@gmail.com",
  "requesterName": "XYZ",
  "requesterPhone": "xxxxx-xxx-xxxx",
  "description": "",
  "newRequestEmailSubject": "You have a document to sign",
  "requesterMessage": "Kindly eSign your KAiZEN Test PDF",
  "signers": [
    {
      "signerEmail": "signer1@gmail.com",
      "signerName": "Signer1",
      "signerPhone": "xx-xxx-xxxx-xxx",
      "order": "1",
      "signerRole": "signer"
    },
    {
      "signerEmail": "signer2@gmail.com",
      "signerName": "Signer2",
      "signerPhone": "xxx-xxx-xxxx-xxxx",
      "order": "2",
      "signerRole": "reviewer"
    }
  ],
  "docDescription": "Base 64 string based test doc",
  "callbackurl": ""
})
headers = {
  'Content-Type': 'application/json'
}
conn.request("POST", "/api/Sign/RequestStr?code=mLgEBTpi9dfooQ6TB9gc7sa4qiIuuxmqQYoTx8nQQ1StAzFu93g06A==", payload, headers)
res = conn.getresponse()
data = res.read()
print(data.decode("utf-8"))
Sample API Response:
								{
“FailRules”: [],
“Data”: {
“SignRequestId”: “01HV6MEARQD3X8ZXXX5FR3YDB8”,
“RequestNo”: “KAiZEN-118”
}
}
Once the request is accepted, a unique request ID is returned. If a callback URL is provided, a signed PDF will be sent to the specified endpoint after all signers have completed their actions.
What Happens After the API Call?
Each signer receives an email notification to begin signing, following the pre-defined order. The signing flow is intuitive and secure.
How the KAiZEN Signing Workflow Operates
-
Check Email Inbox
Each signer receives an email from KAiZEN with a link to sign.

-
Click to Begin
The email contains a secure link labeled “Sign Here” which opens the KAiZEN signing editor.

-
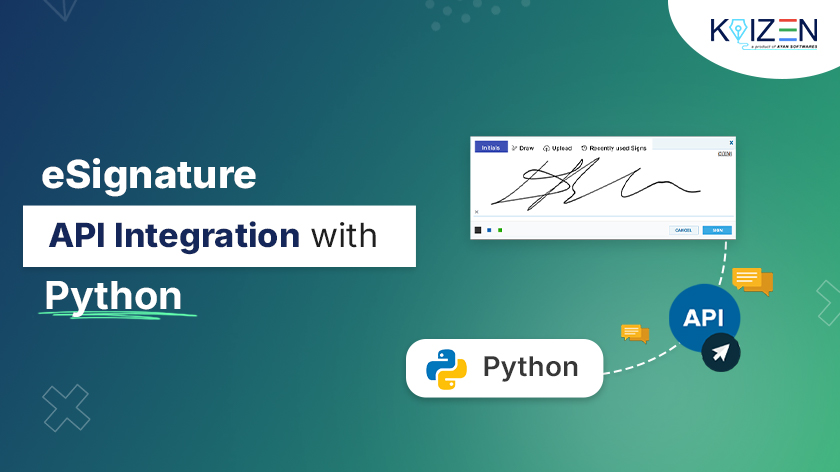
Sign the Document
After clicking on the “Sign Here” button. You’ll get a popup where you can choose the following methods to eSign:
- Initials
- Draw your signature
- Upload an image of your signature
- Recently Used Signs

-
Submit and Done
Once you’ve placed your signature, click Submit. The next signer in the sequence will then be notified.

-
After All Signers Complete
Once every signer has completed the process:
- Each signer will receive an email with the final signed document.
- If a callback URL was configured, a copy of the signed document will be automatically sent to that system (e.g., Java or your application).

Conclusion
Integrating KAiZEN’s eSignature API with Python allows you to build robust digital signing workflows that are secure, scalable, and easy to manage. Whether you’re handling contracts, approvals, or forms, this integration empowers your Python applications with seamless automation and real-time status tracking.
Ready to transform your document signing process? Start integrating with KAiZEN and bring smarter eSignatures to your Python applications today.
Sign up for Free
Trial today!
Try KAiZEN for free
Manual document signing slows down your operations, introduces errors, and compromises security. If you’re using Python to power your applications, integrating an eSignature API like KAiZEN can eliminate these challenges. With just a few API calls, you can send documents, request signatures, and verify status—all programmatically.
This blog will guide you through the process of integrating KAiZEN’s eSignature API with Python, enabling a more efficient and automated document workflow.
How to integrate eSignature into Python Applications:
Step 1:
Begin by listing the individuals who need to sign the document and determining the sequence of their signatures. KAiZEN allows for sequential signing, ensuring signers follow the order you define.
For Example:
Signer Information
| Signer Name | Order | Signer Email |
|---|---|---|
| Signer 1 | 1 | signer1@gmail.com |
| Signer 2 | 2 | signer2@gmail.com |
-
Step 2:
You’ll need to initiate a secure HTTP POST request to the KAiZEN “Initiate Sign API” with the following parameters:
HTTP Call Details
Parameters Name Value Content-Type application/json Method POST Endpoint https://fa-kaizen-prod.azurewebsites.net/api/Sign/RequestStr?code=RTa1A0GW5Yl92OF54-73lRqglLFCt_0pVcg86hWf1EjtAzFuNROcdA== Body JSON Body with parameters Key Parameters for the Request Body
Parameters Name Description Required? docContent Base64 Content for the PDF File Yes docName Name of the File Yes appToken Unique Code to initiate the request Yes requesterEmail Email address of the person initiating the request Yes requesterName Name of the person initiating the request Yes description Describes the document NO signers An array of the signers who needs to sign the document in the pre-defined order. Yes CallBackURL CallbackURL defines the url on which the KAiZEN should send a response once all the signers signs the document. It can be webservice url of Salesforce or any external page.
Eg: https://duumy.my.salesforce- sites.com/services/apexrest/KaizenCallbackURL/No newRequestEmailSubject Describes the email subject No requesterMessage Describes the prompt eSignature field No docDescription Describes the document No -
Step 3:
Python Code Sample for Integration
import http.client
import json

conn = http.client.HTTPSConnection("fa-kaizen-staging.azurewebsites.net")
payload = json.dumps({
  "docContent": "<>",
  "requesterEmail": "xyz@gmail.com",
  "requesterName": "XYZ",
  "requesterPhone": "xxxxx-xxx-xxxx",
  "description": "",
  "newRequestEmailSubject": "You have a document to sign",
  "requesterMessage": "Kindly eSign your KAiZEN Test PDF",
  "signers": [
    {
      "signerEmail": "signer1@gmail.com",
      "signerName": "Signer1",
      "signerPhone": "xx-xxx-xxxx-xxx",
      "order": "1",
      "signerRole": "signer"
    },
    {
      "signerEmail": "signer2@gmail.com",
      "signerName": "Signer2",
      "signerPhone": "xxx-xxx-xxxx-xxxx",
      "order": "2",
      "signerRole": "reviewer"
    }
  ],
  "docDescription": "Base 64 string based test doc",
  "callbackurl": ""
})
headers = {
  'Content-Type': 'application/json'
}
conn.request("POST", "/api/Sign/RequestStr?code=mLgEBTpi9dfooQ6TB9gc7sa4qiIuuxmqQYoTx8nQQ1StAzFu93g06A==", payload, headers)
res = conn.getresponse()
data = res.read()
print(data.decode("utf-8"))
Sample API Response:
								{
“FailRules”: [],
“Data”: {
“SignRequestId”: “01HV6MEARQD3X8ZXXX5FR3YDB8”,
“RequestNo”: “KAiZEN-118”
}
}
Once the request is accepted, a unique request ID is returned. If a callback URL is provided, a signed PDF will be sent to the specified endpoint after all signers have completed their actions.
What Happens After the API Call?
Each signer receives an email notification to begin signing, following the pre-defined order. The signing flow is intuitive and secure.
How the KAiZEN Signing Workflow Operates
-
Check Email Inbox
Each signer receives an email from KAiZEN with a link to sign.
-
Click to Begin
The email contains a secure link labeled “Sign Here” which opens the KAiZEN signing editor.
-
Sign the Document
After clicking on the “Sign Here” button. You’ll get a popup where you can choose the following methods to eSign:
- Initials
- Draw your signature
- Upload an image of your signature
- Recently Used Signs
-
Submit and Done
Once you’ve placed your signature, click Submit. The next signer in the sequence will then be notified.
-
After All Signers Complete
Once every signer has completed the process:
- Each signer will receive an email with the final signed document.
- If a callback URL was configured, a copy of the signed document will be automatically sent to that system (e.g., Java or your application).
Conclusion
Integrating KAiZEN’s eSignature API with Python allows you to build robust digital signing workflows that are secure, scalable, and easy to manage. Whether you’re handling contracts, approvals, or forms, this integration empowers your Python applications with seamless automation and real-time status tracking.
Ready to transform your document signing process? Start integrating with KAiZEN and bring smarter eSignatures to your Python applications today.