How to Download & Install KAiZEN Tally Installer?

In today’s fast-paced business world, efficiency and security are more important than ever — especially when it comes to managing financial data. That’s where KAiZEN comes in. Designed to enhance your Tally experience, KAiZEN introduces a secure Installer Plugin to integrate eSignatures with Tally.
This powerful addition allows Users to easily sign invoices, purchase orders, and other documents digitally, cutting down on manual paperwork, speeding up approval cycles, and ensuring better compliance with digital security standards.
In this blog post, we’ll show you how to download and install the KAiZEN Tally Installer, quickly and effortlessly. Whether you’re a first-time user or upgrading your existing setup, this step-by-step tutorial ensures a smooth start.
Most Important Features of KAiZEN Tally Installer
- Ability to sign any voucher types supported in Tally.
- KAiZEN installer is installed on machine on which tally is configured.
- User can send eSign request to single or multiple customers in single request.
- Customer can sign documents in multiple ways like manual draw, upload sign, auto-generate with name initials.
- The signed document has secure and verified signature.
- Easy to install and use with user-friendly interface
Step-by-Step guide on how to install the KAiZEN Tally installer:
-
Step 1:Download the KAiZEN Tally installer from the below link (Skip this step and jump to step 2, if the installer is already downloaded) Click here to download
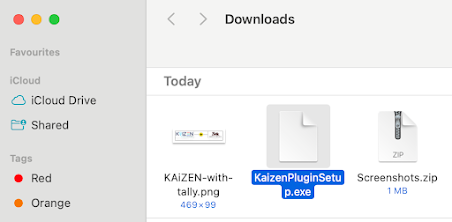 Step 2:Once the installer is downloaded, double click on the .exe file and it will display below screen and click next.
 Step 3:On next screen, review and accept the “License Agreement” and click next
 Step 4:On next screen, select the folder/directory in which tally is installed and click next
 Step 5:Finally we are on the last step, click on the install button
and here comes the completion screen. Click Finish and we are done with installation part.
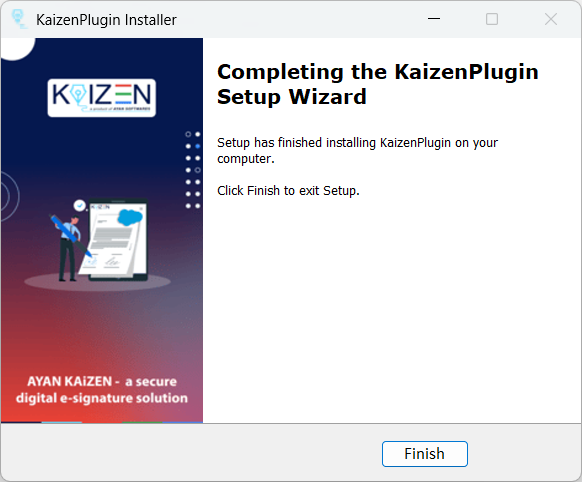 Step 6:Open the Tally application
Press “F1” to open Help and select the “TDLs & AddOns” option
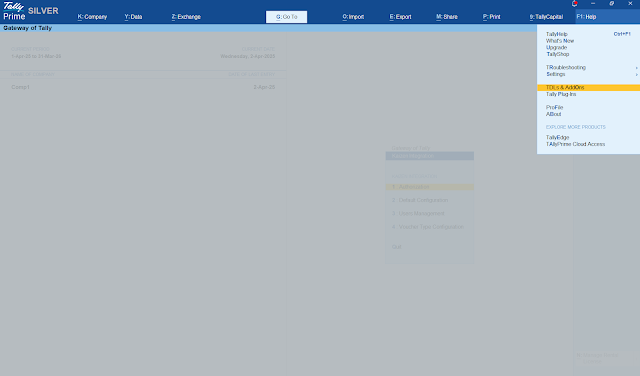
It will open the TDLs configuration page, where user needs to perform two actions:
- a. Mark the “Load the selected TDL files on startup” as “Yes”
- b. Select the .tcp file with name as “Tally Integration.tcp”, which can we found at the folder path on which installer was installed
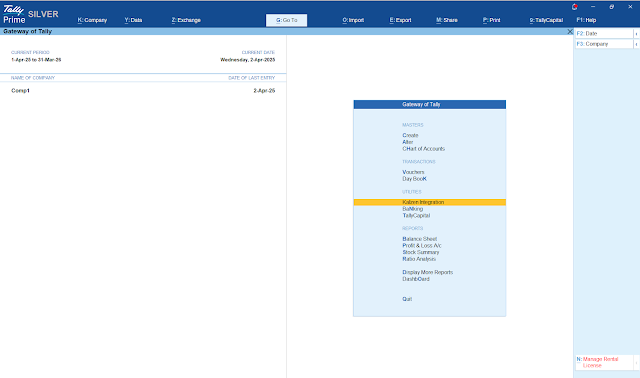
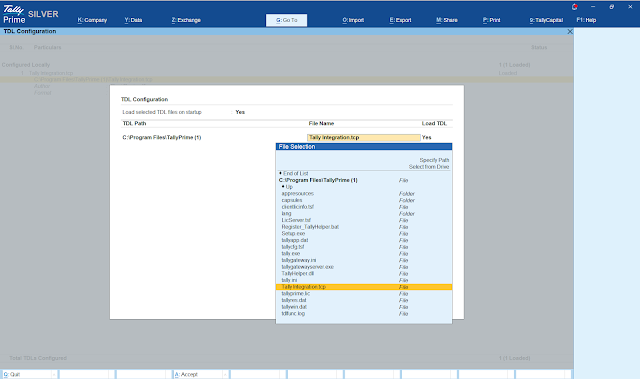 Step 7:Press “G” to open below screen, where it will show the KAiZEN under utilities
Post install configuration for the KAiZEN Tally installer:
Once the installer is installed successfully and KAiZEN is visible under the Utilities, user needs to configure the its settings before it can be operational.
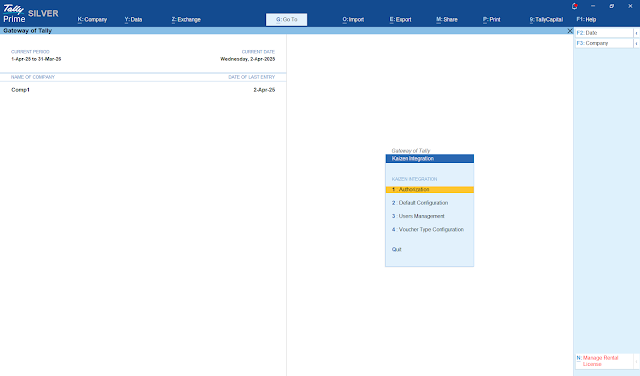
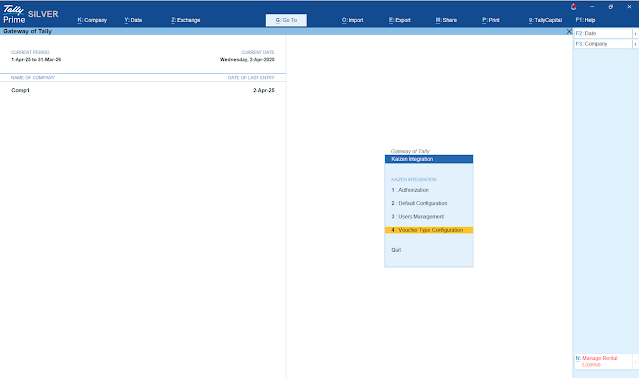
Select KAiZEN under the utilities and click enter and it will show below screen with four settings. Let’s go through these settings one by one.
KAiZEN Settings:
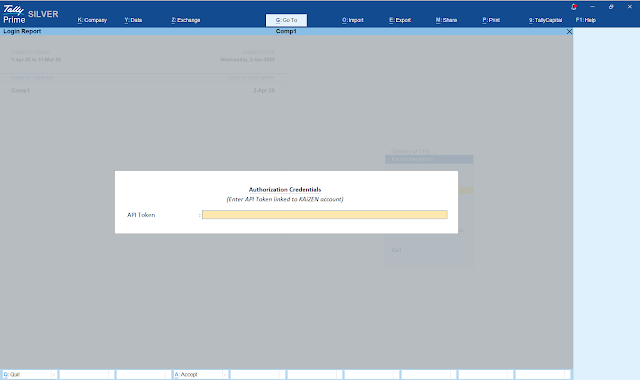
Authorisation: User needs to enter the activation / API token received from the KAiZEN team. Incase, you don’t have it, please reach “sales@ayansoftwares.com” for more details.
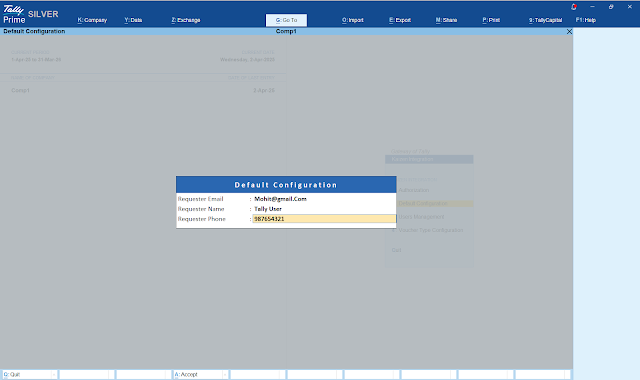
Default Configuration: In KAiZEN, every sign request will have a sender, who send the document to its customer or user for eSigning. So in order to configure the default sender for the every request, It has the option for “Default configuration” where Tally admin can configure the sender details. In case tally admin, wants to configure sender details for each user, please check the next settings option.
User management: Under the user management, tally admin can define the name, email and mobile for each users which will be used as “sender” information. In case the if any user information is not configured, the KAiZEN will use the details configured in “Default Configuration”
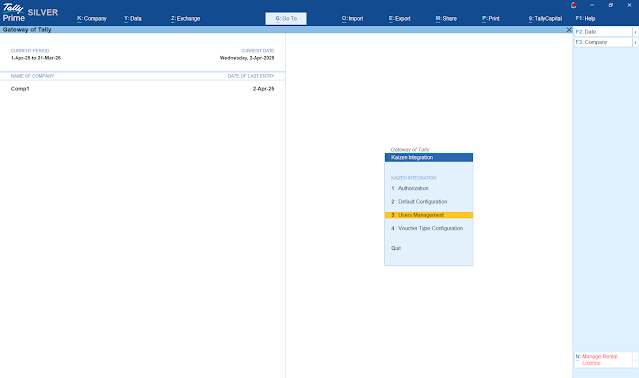
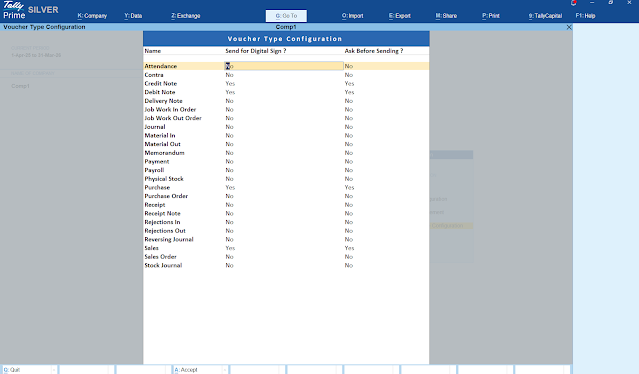
Voucher Type Configuration: Under this settings, tally admin can configure which voucher types will send for the document for eSigning. Also, tally admin can configure if tally should show a confirmation box before sending the document for eSigning.
Finally once all these steps are performed, we are ready to use the KAiZEN with tally and send the documents for eSigning in few simple steps.
Conclusion
Integrating eSignatures within Tally has never been easier. With just a few clicks, you can download, install, and begin using a smarter version of Tally that’s designed to save time and boost your productivity. Whether you’re managing a small business or running a busy accounting firm, KAiZEN simplifies your financial operations.
Don’t forget the added advantage — integrating eSignatures directly within Tally. This not only enhances document security and speeds up workflow approvals but also keeps your business in line with today’s digital compliance standards.
Sign up for Free
Try KAiZEN for free
Trial today!
In today’s fast-paced business world, efficiency and security are more important than ever — especially when it comes to managing financial data. That’s where KAiZEN comes in. Designed to enhance your Tally experience, KAiZEN introduces a secure Installer Plugin to integrate eSignatures with Tally.
This powerful addition allows Users to easily sign invoices, purchase orders, and other documents digitally, cutting down on manual paperwork, speeding up approval cycles, and ensuring better compliance with digital security standards.
In this blog post, we’ll show you how to download and install the KAiZEN Tally Installer, quickly and effortlessly. Whether you’re a first-time user or upgrading your existing setup, this step-by-step tutorial ensures a smooth start.
Most Important Features of KAiZEN Tally Installer
- Ability to sign any voucher types supported in Tally.
- KAiZEN installer is installed on machine on which tally is configured.
- User can send eSign request to single or multiple customers in single request.
- Customer can sign documents in multiple ways like manual draw, upload sign, auto-generate with name initials.
- The signed document has secure and verified signature.
- Easy to install and use with user-friendly interface
Step-by-Step guide on how to install the KAiZEN Tally installer:
-
Step 1:Download the KAiZEN Tally installer from the below link (Skip this step and jump to step 2, if the installer is already downloaded) Click here to download
 Step 2:Once the installer is downloaded, double click on the .exe file and it will display below screen and click next.
 Step 3:On next screen, review and accept the “License Agreement” and click next
 Step 4:On next screen, select the folder/directory in which tally is installed and click next
 Step 5:Finally we are on the last step, click on the install button
and here comes the completion screen. Click Finish and we are done with installation part.
 Step 6:Open the Tally application
Press “F1” to open Help and select the “TDLs & AddOns” option

It will open the TDLs configuration page, where user needs to perform two actions:
- a. Mark the “Load the selected TDL files on startup” as “Yes”
- b. Select the .tcp file with name as “Tally Integration.tcp”, which can we found at the folder path on which installer was installed
 Step 7:Press “G” to open below screen, where it will show the KAiZEN under utilities
Post install configuration for the KAiZEN Tally installer:
Once the installer is installed successfully and KAiZEN is visible under the Utilities, user needs to configure the its settings before it can be operational.
Select KAiZEN under the utilities and click enter and it will show below screen with four settings. Let’s go through these settings one by one.

KAiZEN Settings:
Authorisation: User needs to enter the activation / API token received from the KAiZEN team. Incase, you don’t have it, please reach “sales@ayansoftwares.com” for more details.

Default Configuration: In KAiZEN, every sign request will have a sender, who send the document to its customer or user for eSigning. So in order to configure the default sender for the every request, It has the option for “Default configuration” where Tally admin can configure the sender details. In case tally admin, wants to configure sender details for each user, please check the next settings option.

User management: Under the user management, tally admin can define the name, email and mobile for each users which will be used as “sender” information. In case the if any user information is not configured, the KAiZEN will use the details configured in “Default Configuration”

Voucher Type Configuration: Under this settings, tally admin can configure which voucher types will send for the document for eSigning. Also, tally admin can configure if tally should show a confirmation box before sending the document for eSigning.


Finally once all these steps are performed, we are ready to use the KAiZEN with tally and send the documents for eSigning in few simple steps.
Conclusion
Integrating eSignatures within Tally has never been easier. With just a few clicks, you can download, install, and begin using a smarter version of Tally that’s designed to save time and boost your productivity. Whether you’re managing a small business or running a busy accounting firm, KAiZEN simplifies your financial operations.
Don’t forget the added advantage — integrating eSignatures directly within Tally. This not only enhances document security and speeds up workflow approvals but also keeps your business in line with today’s digital compliance standards.
Sign up for Free
Try KAiZEN for free
Trial today!
Got a query? We're here 24/7

